MFFL Training Camp: Defensive Schemes
- Michael P.

- Aug 25, 2020
- 10 min read
Updated: Sep 7, 2021
With the completion of the annual fantasy draft, the teams from around the MFFL have all reported for training camp, where their General Managers will be going over team strategy and tactics for the upcoming season. New this year to the MFFL is a scoring feature centered around defensive schemes, in which GMs can choose a defensive strategy for each matchup in order to combat opposing offensive threats. With the added diversity and decisions GMs will need to make in addition to their weekly lineups, the defensive scheme feature should add to the excitement and suspense of each week as a team will now have some control over how points are being scored against them. As teams study and train over how to optimally implement these new defensive schemes into their matchups, here is a breakdown of each scheme along with the its advantages and disadvantages for GMs to coach into their players (and use as a refresher themselves for each scheme throughout the season):

QB Spy/Contain
Aiming to suppress a mobile QB's scrambling and rushing ability, the QB Spy/Contain scheme puts a LB spy on the QB. Furthermore, the DEs will play a heavy contain responsibility to funnel the QB into inside pressure from blitzes and into the awaiting spy. The opposing QB's rushing stats will all be reduced (-75% QB rush yards, -50% QB rush 1Ds, and -33.3% QB rush TDs) however, with the loss of LB spy in coverage, holes will be open in the secondary resulting in increases to both QB passing (+5% pass yards) and WR receiving (+5% WR rec yards). This scheme is best used on a mobile QB who may struggle throwing, as more technical and elite passers will be able to pick through the vulnerable secondary. However, this scheme can absolutely suffocate the rushing threat of a QB allowing for more predictable point scoring from the opposition.


Lockdown:
The Lockdown scheme is a strategy designated for smothering and shutting down an opposing team's best skill player (RB, WR or TE). When using this scheme, a team's defensive coordinator will spend all week preparing for a single, chosen individual through game films and practice. For a RB, this means having a LB shadowing the runner with an overload of defensive tackles while also including a safety or other defensive back to double cover on his routes. For WRs and TEs, Lockdown will include double coverages with jams at the line while also having 2 corners with inside and outside leverage to cover against either kinds of releases and route stems. Furthermore, a safety will always be designated on that side of the field for extra protection over the top. With this scheme, a team is essentially declaring they will not be beaten by the opposition's star player, challenging their supporting cast to beat them instead. The locked down, star player will have his total points cut in half, while all other skill position players will receive a 10% point boost as they will be facing single coverage and empty zones to take advantage of. This scheme is best used against a team with a clear star player, but could be exposed against well balanced teams.


Stacked Box:
When facing a team with a stacked backfield of stud RBs, the stacked box defensive scheme will work best to diminish a team's rushing threat. By overloading the tackle box with LBs and a Strong Safety. This will allow for each gap of the O-Line to be fully accounted for, while also having a numbers advantage to have a free backer clear on the runner. With nowhere to run, this scheme will ensure making contact with the RBs at or before the line of scrimmage, resulting in a large decrease in an opposing team's rushing yards (-50% non-QB rush yards). However, with the added pressure in the box, the opposition's WR will be facing single coverage on the outside and a team will be vulnerable through the air while running a stacked box defense (+20% WR rec yards).

In this lineup, the Will (Weak Side LB) and Mike (Middle LB) are responsible for the two RBs should they run out to the flats. This is their primary assignment before stepping up to fill the B gaps. The Sam (Strong Side LB) is responsible for the TE since the SS is playing a hook zone. Furthermore, the DT and LBs can switch gap responsibilities in which the LBs fill the B gaps (between Guard and Tackle) while the DTs fill the A gaps (between Center and Guard). This can create immediate inside penetration as the Nose Tackle occupies the Center.

Cover 2:
Cover 2 man is a basic defensive scheme that has man coverage for all potential pass catchers, with 2 safeties playing deep zones. The 2 safeties "cut" the field in half and are each responsible for all deep routes on their side of the field, providing help to both outside corners. The added help against a team's X and Z receivers will limit the opposition's receiving yards from WRs (-40% WR rec yards). This scheme however, suffers from potential mismatches against a team's RBs and TEs who will be being covered by LBs or nickel corners. With a gap in the deep middle of the field, the seam of the defense, TE seam routes and RB angle routes can find the gap in the zones while beating their man either with a size or speed advantage. Furthermore, RB wheel routes are particularly dangerous as well, due to their speed to beat the covering LB outside and up the sideline while the safety is stuck helping on the WR. This will result in a boost to RB and TE receiving yards (+30% RB and TE rec yards). Thus, while performing strongly against a team of great WRs, an opposition with skilled receiving backs and TEs will be able to find and punish the holes in this defensive scheme.

The nickel corner (covering the slot receiver) may be substituted for a LB if the offense is using 21 personnel (2 RBs, 1 TE) or 12 personnel (1 RB, 2 TEs) in which case the new LB will cover the new RB/TE.

Cover 3:
Cover 3 is a zone based defensive scheme that includes 3 deep zones. The 2 CBs and Free Safety, operating the deep zones, will split the field into thirds, while the LBs and Strong Safety will cover the underneath hook and flat zones. This will provide added coverage against deep threats while also having 4 zones underneath to cover the passing game at mid range resulting in a decrease in the oppositions total receiving ability (-25% rec yards). With only 4 defenders rushing, and 7 dropping into zone responsibilities, this scheme is particularly vulnerable to the run, especially a draw play since the LBs would have already cleared out to their hook/flat zones, leaving a ton of space for the RB (+20% non-QB rush yards). While cover 3 will work in limiting the opposition's receiving threats from all sources, a solid RB room will be able to exploit the numbers advantage in the box.

The DEs line up in the 5 tech (outside shoulder of the Tackle) in preparation for an outside pass rush. This further opens up the inside for rushing plays.

Goal Line Defense:
This defensive scheme mimics a bend but don't break defensive philosophy in which a defense will aim at preventing a Touchdown at all costs. A set of prevent coverages while an opposing offense is driving up the field will allow for offenses to sustain drives with room for chunk plays and first downs, in order to prevent long touchdowns. Once the opposition has driven up the field, deep into redzone territory, the Goal Line defense will be implemented. This centers around strong inside penetration to shut down inside runs and play action along with great jamming CBs to disrupt the timing of WR fade, drag, or quick slant routes. Most importantly, are the LBs who must be able to have immediate play recognition in order to pursue a leaking RB or TE sneaking to the flat, or explode through their gap responsibility when detecting a run play. This scheme will reduce non-passing Touchdowns, but will result in giving up more first downs from sustained drives (-50% non-pass TDs, +50% 1Ds).

The middle LB in this case is a "free man" and is responsible for recognizing the play and making a play on the ball. The middle LB can be substituted for a FS to run a goal line zone scheme rather than man.
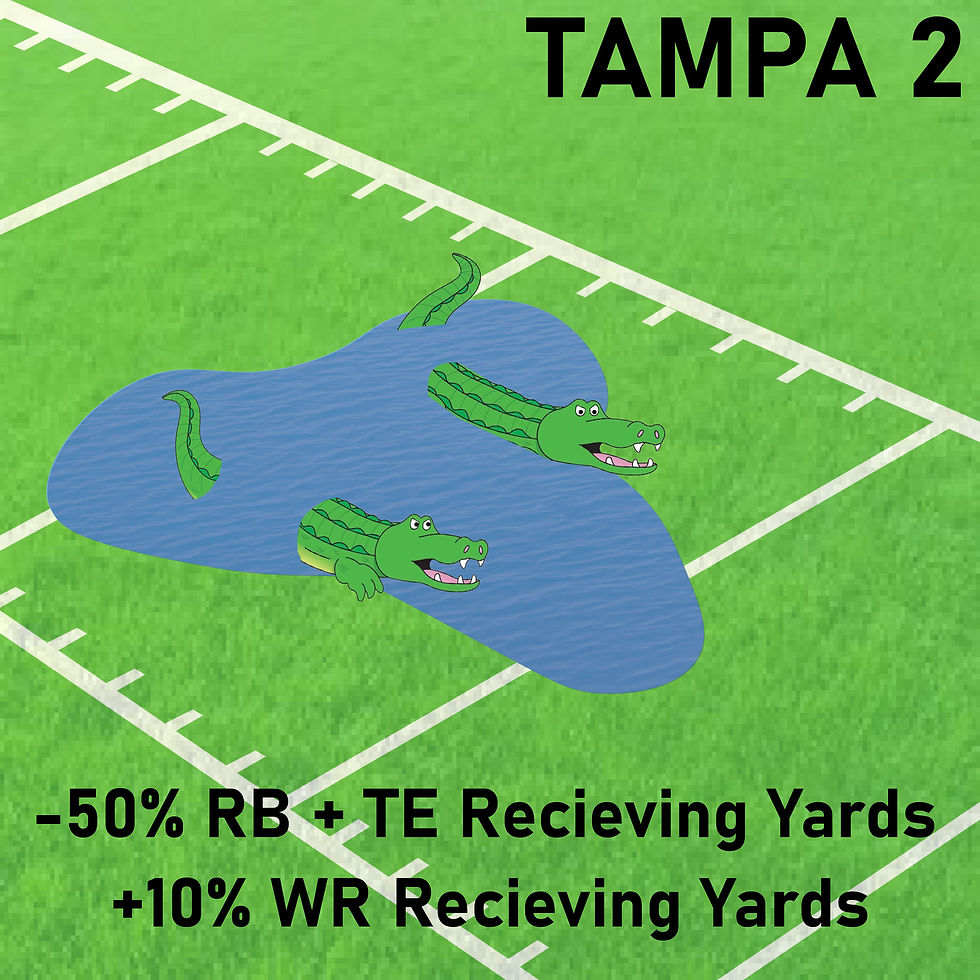
Tampa 2:
The Tampa 2 defensive scheme is an adaptation of Cover 2 that aims to fix the weaknesses of the Cover 2 man scheme. Tampa 2 maintains the 2 deep safeties, however instead of man coverage outside, the corners and LBs all play underneath zones. Most importantly, the Middle LB plays a deep middle zone to cover the seam, the most vulnerable spot of a normal Cover 2 defense. The middle zone, along with the other underneath flat and hook zones will restrict the receiving threat of both RBs and TEs as the seam, angle, flat, and wheel routes are all covered (-50% RB and TE rec yards). Instead, the outside WRs are freed from their man coverage and instead can work to find gaps in the outside zones. This scheme is most vulnerable to corner, comeback, and curl routes, which can be executed by elite outside WRs to take advantage of this zone based scheme.

The flat and wheel routes from the RBs will be picked up by the flat Corners, while the WRs will be able to operate their routes by getting behind these Corners and cutting short or outside to catch the ball under the Safety covering the deep ball.
Dime 'N Disguise:

This defensive scheme substitutes in 2 extra DBs to overload the secondary. The extra DBs (typically corners) are the nickel and dime backs, which can be utilized in man coverage on slot receivers or as a flat zone corner while the outside corners play deep. The extra DBs in the secondary allow the defense to disguise their play by running various stunts with Cover 6 (playing Cover 4 on half the field and Cover 2 on the other half), a mix of man and zone coverage, and outside blitzes. The crowded secondary makes it difficult for a pocket passer to read the defense pre-snap, while also making it difficult to find gaps in the zones. This results in a reduction in an opponents passing yards and touchdowns (-33% pass yards, -25% pass TDs) as well as forcing extra interceptions (2x interceptions), but the lost D-Line and LBs leave the defense vulnerable to a short, consistent running game (+25% rush yards). This scheme works best when facing a cerebral and elite pocket QB by throwing an array of complex coverage schemes at him, especially if the RBs are not too threatening.


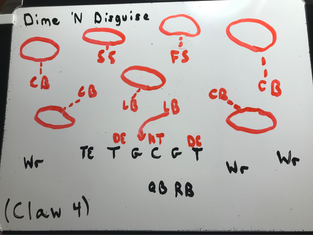
These show the versatility of coverages the Dime Defense is capable of running. On the left, "Cover 6" refers to the deep coverages in which the left Corner and Strong Safety split the left side of the field, similar to a Cover 4 zone, while the right corner plays man leaving the Free Safety to cover the entire deep right, similar to Cover 2. This play works well by showing the QB what appears to be Cover 2 man coverage, due to the close alignment of each DB over a WR or TE, before they drop into their zones. In the middle, "Gunner 3" refers to the cornerback blitz and 3 deep zones the defense runs. This play aims to show the QB Cover 4 or Cover 6 by having the outside corners and Strong Safety off the ball, before shuffling into their zones or blitz. Furthermore, the DEs jump out of their normal blitz contain into the flat, allowing for the corners to blitz from the outside. The goal of this play is to ease the QB away from calling a hot route pre-snap, before sending in corner blitzes from the outside. Ideally, the Guard, upon seeing the DE drop into coverage, will double the NT to aid his Center. This will allow for the Strong Safety's late blitz to shoot through the gap, unimpeded towards the unsuspecting QB. On the right, "Claw 4" refers to the claw blitz from the LB while the DBs play Cover 4 deep. In this play, the NT will shoot to the right, turning the Center with him and engaging in a double team with the Right Guard, while the Left DE will attack inside the Tackle rather than his normal contain responsibility. This will ideally trigger the left Guard to double the incoming DE, creating a gap for the LB's delayed blitz between the Guard and Center who are both already occupied. The 7 men in coverage will allow time for the blitz to develop, potentially forcing the QB to step up into the incoming blitz as he holds onto the ball.

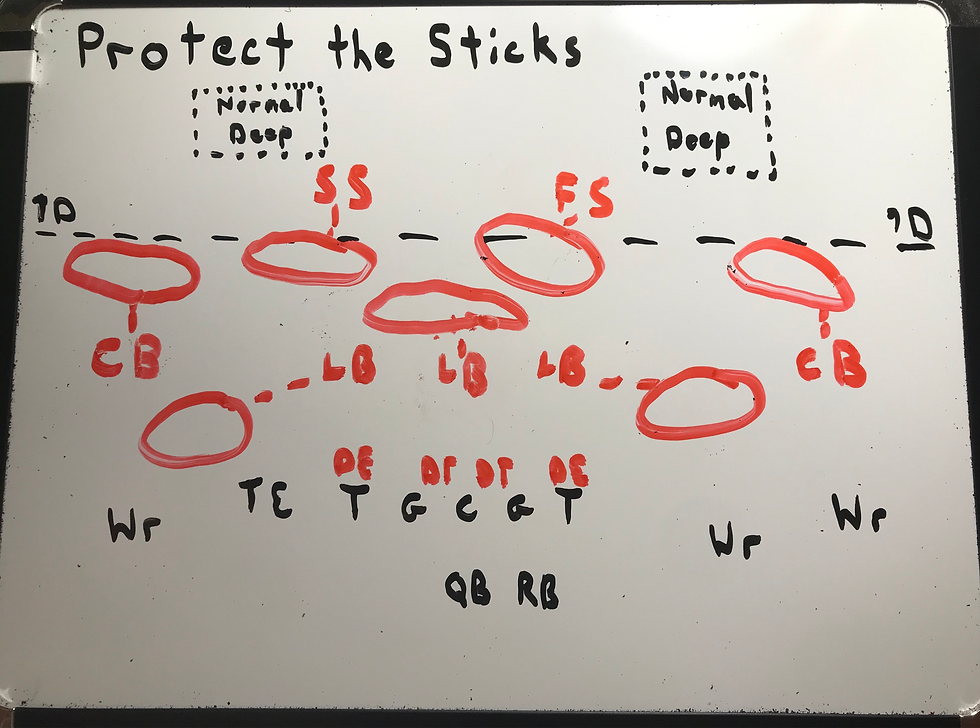
Protect the Sticks:
This defensive philosophy places its zone coverages right near the first down markers in order to prevent the opposition from getting first downs and keeping drives alive. While significantly reducing the total first downs the opposition will convert, this scheme is vulnerable to big play potential as the safeties and corners cover the first down line to gain rather than their normal deep zones (-75% 1Ds, +20% TDs). This scheme is best used against an opposing team that has many possession receivers and players who get a lot of yardage but not many touchdowns. In a low scoring fantasy game in which very few touchdowns are scored, this scheme could be the difference that tips the scale in your favor.

Field Position:
This coaching mindset is centered around maintaining a strong field position in order to limit points given up through special teams, opposition's defensive turnovers, and field goals. This philosophy emphasizes limiting the unpredictable nature of kickers and Team Defenses by implementing sustained drives on offense for more time of possession and avoiding mistakes on special teams. Although the opposition will typically gain more yardage due to the lack of preparation against offensive weapons, the oppositions Kicker and Defensive points will be significantly reduced (-60% Kicker and Defense points, +10% All Yards). The longer fields for opposing offenses to traverse will result in fewer Field Goal opportunities while the added Time of Possession will cause opposing defenses to tire out and make fewer big plays and turnovers. This scheme is best used against a team with an elite scoring defense and a kicker on a high powered offense.
This completes our breakdown of each Defensive Scheme available in this year's MFFL playbook. Thank you GMs for reporting to MFFL Training Camp as you prepare to train your defenses and become experts on implementing these Defensive Schemes into your weekly matchups! This article will stay up all season, so please use this as a resource to remind yourself on the advantages and disadvantages of each scheme when making your scheme decision as you prepare to face opposing fantasy teams. We at MFFL Studios wish everyone the best of luck as we finish up Training Camp and get ready for the start of the 2020 season. See you all soon!


Comments